MYOB Sync for Shopify: Detailed Setup Guide
Shopify · Practical documentation · Reviewed 12 November 2026
Connect your Shopify sales to MYOB and send MYOB stock levels back to the right Shopify location.
Before you start
- A Shopify store with permission to install apps.
- An authorised MYOB login and the correct online company file.
- Consistent Shopify variant SKUs and MYOB item numbers.
- A plan that includes your chosen inventory, sales or advanced flows.
Install MYOB Sync through the Shopify App Store, then open it from your store admin.
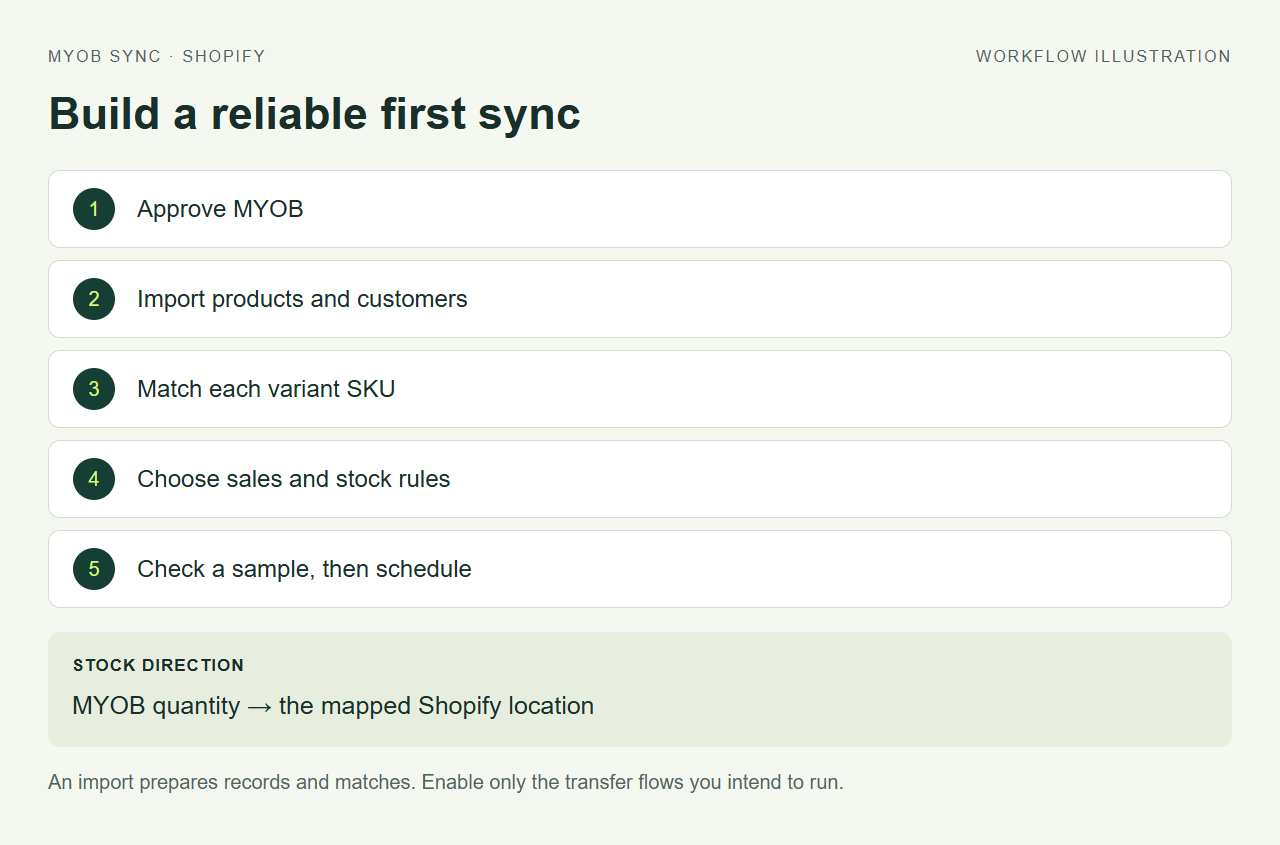
The setup sequence
- Install and open MYOB Sync
- Authorise MYOB and check the company file
- Import existing records and check SKU matching
- Choose sales, customer and payment rules
- Set the inventory direction and locations
- Run a small test and check the results
- Start the schedule and manage your plan
Step 1 of 7
Install and open MYOB Sync
Find MYOB Sync in the Shopify App Store, select the store you want to connect and approve the app permissions. Open the app from Shopify Apps. Keep this store selected while you configure its MYOB connection.
Step 2 of 7
Authorise MYOB and check the company file
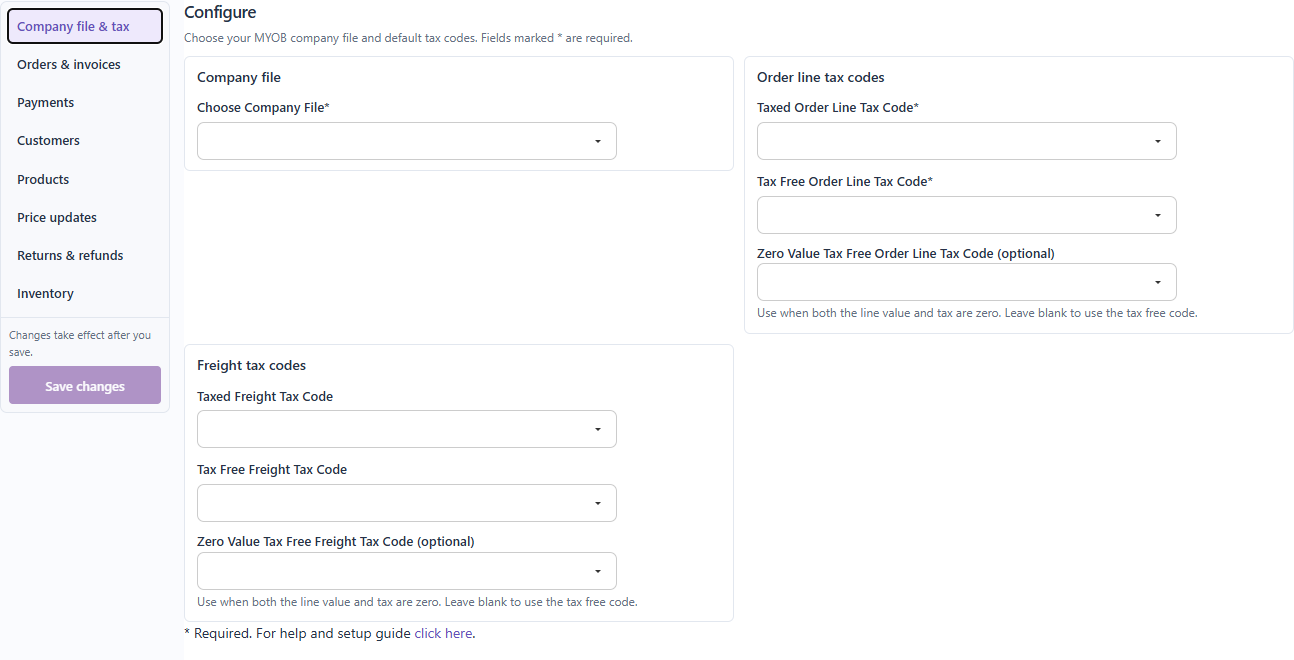
Open MYOB in the app, sign in to MYOB and approve access. Select the company file intended for this store. If several files or logins are available, compare the company name before continuing. Your MYOB account needs access to the sales, customer and inventory features you intend to use.
Step 3 of 7
Import existing records and check SKU matching
Use the product and customer import jobs to bring existing records into MySync. An initial import prepares the match; it is different from creating products or posting sales. Each Shopify variant needs its own SKU matching a MYOB item number. Resolve missing and duplicate item numbers before enabling exports.
Step 4 of 7
Choose sales, customer and payment rules
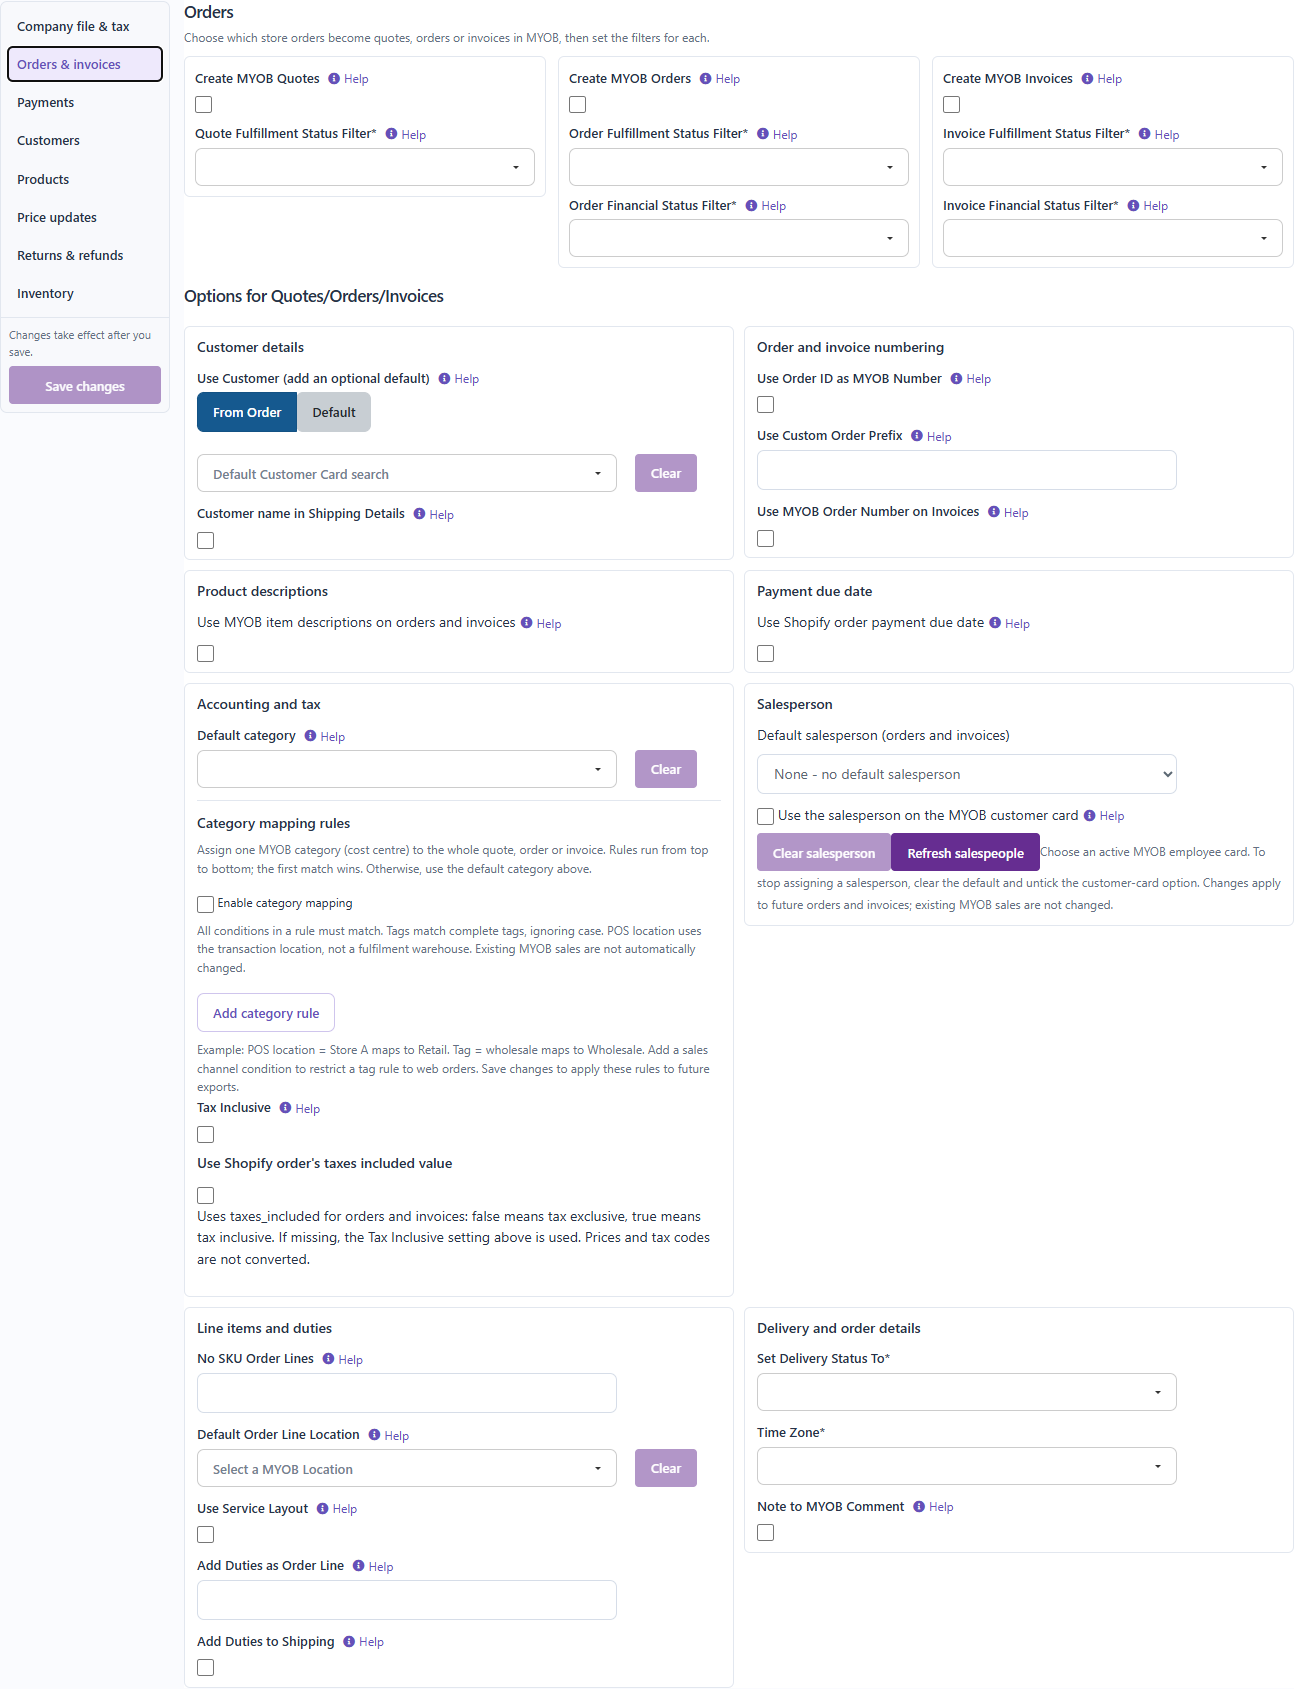
In Settings, choose the MYOB sales document types your business needs. Review the fulfilment and financial filters for orders and invoices separately. Choose whether sales use their own customer card or a generic MYOB customer, then set tax codes and payment accounts.
Do not enable every document type as a test. Start with one eligible sale and confirm its customer, line items, tax, freight and total in MYOB. A payment needs a matching sale and customer; it does not replace the invoice export.
Step 5 of 7
Set the inventory direction and locations
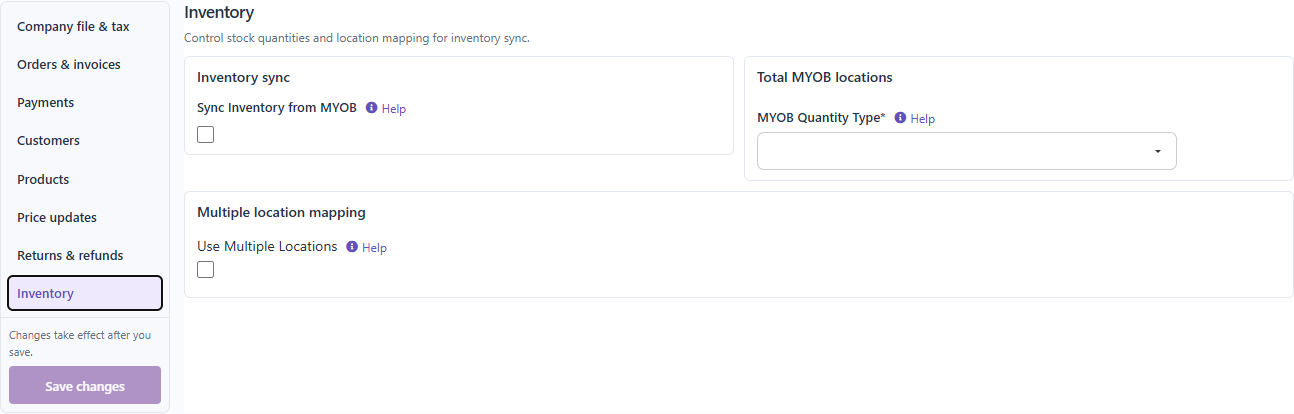
Inventory runs from MYOB to Shopify. Select the MYOB quantity field and destination Shopify location, then check one known variant in both systems. Review location mappings on plans that support multiple locations. Product creation and price updates are separate flows; leave them disabled unless you want those changes.
Step 6 of 7
Run a small test and check the results
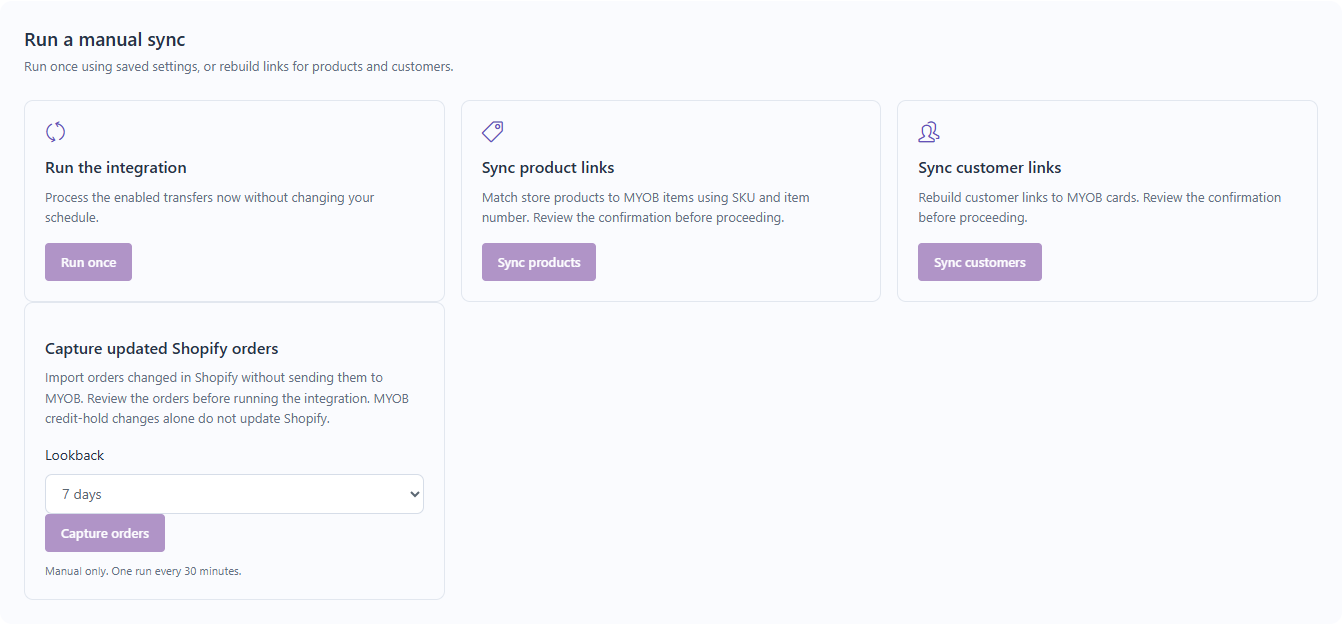
Use Sync jobs for the flows available in your account. Review the relevant Orders, Customers, Payments and Products records, and inspect Logs for errors. For returns, use Refunds & exchanges and confirm the source refund and MYOB result before repeating a run.
Step 7 of 7
Start the schedule and manage your plan
Save your settings and enable the schedule after the first run is correct. The Shopify listing offers manual inventory on Free and scheduled syncing on paid plans, with sales and advanced features on the applicable tiers. Check the current Shopify listing and in-app plan before choosing a flow. Manage this app through Shopify; WooCommerce and BigCommerce billing instructions do not apply to a Shopify subscription.
Decisions to verify before a Shopify transfer
| Setting area | What to verify | What a mismatch can mean |
|---|---|---|
| Sales document filters | Check the order and invoice financial/fulfilment filters independently. | A visible store order may not be eligible for the document type you enabled. |
| Variant identity | Compare the individual variant SKU with its MYOB item number. | A parent product match does not establish every variant match. |
| Customer strategy | Confirm the individual card or selected generic customer. | The payment and sale can fail to link when their customers differ. |
| Inventory location | Check the source quantity field and destination location together. | The total can look right while stock is assigned to the wrong fulfilment location. |
Example acceptance check
Choose one known variant and one sale that meets the saved filters. Note the expected stock location, customer, freight, tax and total. Inspect the resulting records in both systems, then review the log. Keep product creation and price changes out of the first test unless those flows are specifically being checked.
The screenshots above show the current app interface with demonstration data. The additional field reference below supplements the current setup sequence.
Before leaving the first run
- Confirm the store and MYOB company file before transferring data.
- Check one product match and one eligible sales document in both systems.
- Compare customer, currency, tax, freight and total before enabling more flows.
- Review payment and refund results separately from the sales document.
- Enable only the schedule and data flows you intend to run.
For a failed or uncertain result, use the MYOB Sync troubleshooting guide. Send support the platform, store, affected reference, run time and error text. Keep passwords, tokens and payment-card data out of the request.
All help guides · About MYOB Sync
Additional field reference
This section retains additional field descriptions from earlier documentation. Use the current setup sequence and newly captured screenshots above for today’s navigation. Older screenshots have been removed.
On This Page
- Connect MYOB
- Sync Product and Sync Customers
- Settings
- Configure
- Orders
- Payments
- Customers
- Products
- Returns
- Refunds
- Inventory
- Schedule
- Save, Start, Pause & Run Now
- Logs & Errors
Sync your Shopify data with your MYOB Business, AccountRight, Premier or Essentials accounts automatically. The app has a number of data flows between platforms which include products, inventory, customers, orders and transactions. If you require additional options not available in the public app please contact us.
There are a number of steps required in getting your Shopify and MYOB accounts syncing data.
Install from the Shopify app store: https://apps.shopify.com/myob-business
Connect MYOB
- Ensure your MYOB account is correctly setup as show in this guide. Ensure this is the account used when authenticating.
- Go to MYOB page.
- You will be taken to the MYOB website to authorise the connection.
- Once authorisation is completed you will be returned to Shopify.
Sync Products and Sync Customers
On settings page click Sync Products and Sync Customers buttons to sync data between your accounts. This will import all your products and customers from both MYOB and Shopify into the app. These only have to be run once before starting the integration and will not export anything to either store.
Settings
You now can configure your data flow settings before switching on the integration.
If you are already creating products in Shopify and MYOB and wish to remain this way, please ensure the products to and from MYOB is not ticked.
Required settings are marked with a (*) and need to be completed for the app to become available to start.
Refresh button - If at anytime data is not loading on the page please click the Refresh button to load setting option.
- Got to Settings page and select your Shopify store from Select Shopify Account dropdown.
- Select your MYOB account from Select MYOB Account dropdown.
Configure
On the configure page you need to:
Choose Company File: A company file you want to use for the integration.
Tax Code For Taxed Order Lines and Freight: Select the tax code to be used for products and/or freight sold with tax.
Tax Code For Tax Free Order Lines and Freight: Select the tax code to be used for products and/or freight sold without tax collected.
Orders
The app lets you select whether you would like to create Quotes, Orders or Invoices in MYOB. Each process uses its own filters to allow you advanced data flow mapping. For example you can capture all orders into MYOB Orders and only convert them to MYOB Invoices when the fulfillment and/or financial status changes on Shopify.
Create MYOB Quotes: Create quotes on MYOB. Select a fulfillment status to use for creating quotes. Draft orders are available to be used for quotes only. If a quote cannot be created a MYOB error will appear on the Logs page. The app will keep retrying to create quotes for a default 7 days to allow time to fix errors.
Quote Fulfillment Status Filter: Select orders with a specific order fulfillment status. Draft orders by way of of their status being set to draft are available for selection.
Create MYOB Orders: Create orders instead of invoices in MYOB. If an order cannot be created the MYOB error will appear on the Logs page. The app will keep retrying to create orders for a default 7 days to allow time to fix errors.
Order Fulfillment Status Filter: Select orders with a specific order fulfillment status. Default is all orders.
Order Financial Status Filter: Select orders with a specific order financial status. Default is all orders
Create MYOB Invoices: Create invoices in MYOB for orders. If an invoice cannot be created the MYOB error will appear on the Logs page. The app will keep retrying to create invoices for a default 7 days to allow time to fix errors.
Invoice Fulfillment Status Filter: Select orders with a specific order fulfillment status. Default is all orders.
Invoice Financial Status Filter: Select orders with a specific order financial status. Default is all orders.
Use Customer: If you want the customer on the order to be the same as the invoice created in MYOB, select use customer "From Order". It is required that you have Customers to MYOB box ticked and selected Sync all Customers when using the From Order option. You can also create a default customer in case the order is missing an email and/or the customer cannot be found, otherwise the order will not be exported. If instead you wish for a default customer to be used for all orders please select "Generic" and than a customer from the drop down box.
If you do not want Create Customer data flow you will need to select Generic customer option in Orders settings.
Set Delivery Status To: Adds the status on MYOB for either Print, Email, PrintAndEmail or Nothing.
Time Zone: Sets the time zone for order times.
Use Custom Order Prefix (optional): You can create a prefix for your Shopify orders in MYOB.
Use Category (optional): Choose a category to export the order into.
Tax Inclusive (optional): Select if Shopify orders are tax inclusive and this field will be marked as true on MYOB orders.
Customer name in Shipping Details (optional): Adds the customer name to shipping details section in MYOB order.
The format of the address section is:
Company name
First and Last name (this line is added if you select this option)
Address 1
Address 2
City State Postcode
Country
Use Order ID as MYOB Number (optional): Select this if you would like the MYOB order/invoice number to be same as Shopify. If not selected it will use MYOB sequential numbering.
No SKU Order Lines (optional): MYOB requires each order line to be linked to an item before order or invoice can be generated. For order lines that do not have a SKU you can set a default MYOB item to be used automatically. Enter a MYOB item number.
Note to MYOB Comment (optional): Add order note to MYOB order comment section.
Default Order Line Location (optional): Select a default location to use for order lines. If one is not selected the first location in MYOB will be used. If you set up Multiple Location Mapping in inventory section this default location will be ignored.
Use Service Layout (optional): Products are not listed as order lines but instead the account selected is used. This field can be used when no stock is kept in MYOB and you still require orders to export successfully. This requires hybrid layout (services and items) on your company file. More information on hybrid layouts can be found here: https://apisupport.myob.com/hc/en-us/articles/360001325496-Hybrid-Layout
Starting the app will import last day of orders from Shopify and then any new orders.
Orders will keep trying to be exported to MYOB for 7 days if there are errors.
Payments
Create Payments: Create transactions as payments in MYOB. Select the MYOB payment account that these will be deposited into.
Fields set in MYOB include:
- Customer
- Date
- Amount
- Payment method
- Receipt number
- Account
Link Payments to MYOB Orders and Invoices: When you have selected Create MYOB Orders you have the option to link payment to a MYOB order. By default payments are linked to MYOB invoices only. Selecting this option will link it to an order and an invoice if also being created.
Shopify Payment Status Filter: Capture pending and successful payments. Default is successful payments only.
Shopify Payment Method Mapping: Map Shopify payment methods to individual MYOB accounts. Default is all payments to one MYOB account.
Customers
Create Missing Customer Cards for New Orders: This process will create a new customer card in MYOB every time you get a new customer in Shopify. This is required for creating orders with the original customer.
Products
Create Products in MYOB: Automatically creates products in MYOB if they don’t already exist. When an order line includes a SKU that isn’t found in MYOB, the product will be created so the order or invoice can be processed. Without this, you need to manually add missing products in MYOB before the order or invoice can be generated in MYOB.
Each variant will be created as a new item in MYOB. You will need to fill out the accounts that the product will be created under, these are generic and we are unable to change them per product. You may edit the settings at any time if you change these accounts.
Run Product Sync button to ensure products are up to date before activating this option
Fields copied from Shopify to MYOB
Shopify > MYOB
Sku > Number
Title > Name
Body ? HTML Description
Active
Is Inventoried
Is Bought
Is Sold
Selling Details
Price > Base Selling Price
Items Per Buying Unit > 1
Tax Code > Setting (Tax Code For Taxed Orders)
Is Tax Inclusive > Setting (Tax Inclusive)
Buying Details
Items Per Selling Unit > 1
Tax Code > Setting (Tax Code For Taxed Orders)
Is Tax Inclusive > Setting (Tax Inclusive)
Create All Products (available upon request): Creates all products that are not synced to a MYOB product. Default is to only create products that are missing in MYOB when we attempt to export an order.
Create MYOB Products in your Store: Create products from MYOB that are not synced with a matching SKU. Before activating this option click the Product Sync to ensure all products are in sync.
This process will create a new product in your Shopify account for any MYOB product that is not linked to a Shopify product. To activate this please contact us.
This will not create variants in Shopify.
Run Product Sync button to ensure products are up to date before activating this option
Fields copied from MYOB to Shopify
MYOB Shopify Number Sku Name Title Description Body HTML Base Selling Price Price Active or Draft Status
app settings option
Inventory Tracked or Not Tracked
app settings option
Set to Active: Create new products as active. By default products are created in draft status.
Track Inventory: Create new products with track inventory activated. If you plan on using our inventory sync from MYOB we recommend setting this to true or you will need to manually update it on Shopify after products are created.
Returns
This process will create a credit note in the form of an invoice entry with negative stock value and a credit balance. The credit will appear under Returns & Credits in the desktop app or Customer returns in the web app.
You can then choose to settle the credit by applying it to an open invoice or recording a refund: https://www.myob.com/au/support/myob-business/sales/customer-returns-credits-and-refunds
The PO and invoice numbers on MYOB will have "-R" appended to it so it differs from the original order ID. When using sequential numbering on MYOB only the PO number will have "-R" appended. For example you will see invoice and credit note in MYOB like this:
Refunds
This will create a credit refund on MYOB when a Shopify transaction is marked as refunded. The invoice or return/credit note needs to be in credit balance before a refund can be applied.
Additional Options (available upon request)
Refund Returns Only: By default we apply MYOB credit refunds for invoices and returns. This option will only apply refunds to returns.
Inventory
Sync Inventory from MYOB: Sync inventory stock levels from MYOB to your store. You can choose between syncing total of all MYOB location to one store location or mapping individual location on a one to one basis. If you select Multiple Location Mapping the Total MYOB Locations option will be ignored.
Total MYOB Locations
- Choose the Shopify Location you would like your MYOB warehouse to be linked to.
- Select the app Product Group to sync products from. By default it is MYOB AccountRight.
- Please select the quantity type in MYOB that you would like to import:
- Available Quantity
- Quantity on Hand
- Quantity Committed
Multiple Location Mapping
Use Multiple Locations: This will ignore total locations options and map individual locations. You can map all locations or select individual ones for inventory syncing. The Quantity on Hand value in individual MYOB locations is used.
Schedule
When you click start on app the schedule you set will be used. You have the option to set hourly times up to every 15 minutes, daily times and weekly times.
Save, Start, Pause & Run Now
Once your settings are entered click save button. If all required settings have been set and saved the Start button will become available. Click Start to begin scheduled data flows.
The app also has the option to trigger data flows instantly by hitting the Run Now button. This option doesn't require a schedule to be set.
Logs & Errors
The logs page contains details of any issues that have caused any processes to fail.
A list of app specific errors can be found here.
MYOB errors and their solutions can be found in this article. These are usually errors that have to be resolved on MYOB.