MYOB Sync for Stripe: Setup and Troubleshooting
By the MySync team · Updated 17 November 2026
Follow this guide to configure and check your Stripe connection. Review the current app and provider permissions for the flows you choose.
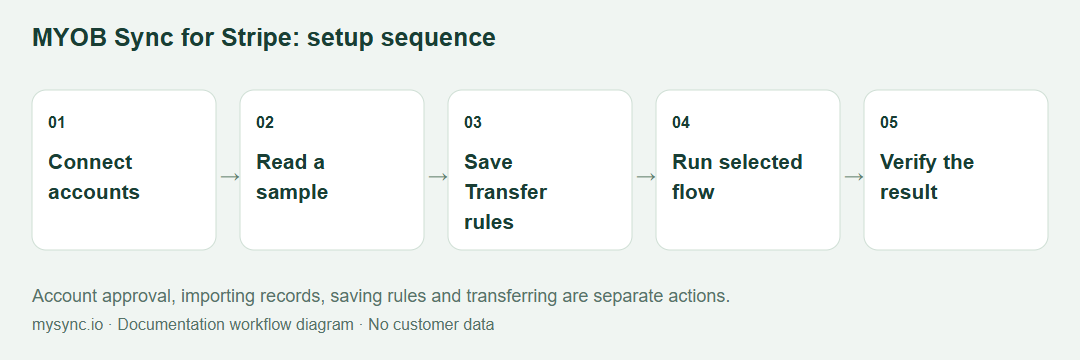
Prepare the account and sample
This guide covers the practical MySync workflow for Stripe. The Stripe product page describes features and business use cases separately.
- Access to the Stripe account whose transactions you reconcile.
- A MYOB company file with the required sales, banking and tax capabilities.
- A Stripe clearing account, bank destination and appropriate fee and income mappings.
Choose a small source sample with an expected destination result. Use an authorised company file and keep automatic flows off while checking the first run. Your MySync subscription and your provider’s own subscription are separate.
Sign in and connect the accounts
- Open MYOB Sync. Register if needed, verify the account and choose Stripe. Existing users return to their saved app.
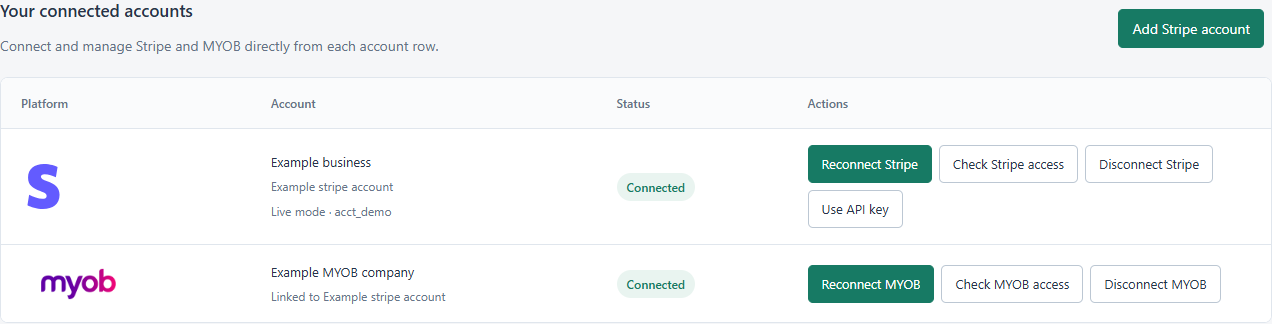
- Open Connections. Read the platform account name and the MYOB company-file name before continuing.
- Use Connect Stripe in Connections and approve the intended Stripe account and mode. Connect MYOB in its account row. Confirm that the Stripe business and MYOB company-file names are correct before importing financial data.
- Use the action in the relevant account row. OAuth approvals open on the provider’s own site. Where a credential form is needed, enter it only inside the app.
- After approval, return to Connections and confirm the displayed account and status. Reconnect when access needs renewing; do not copy an expired authorisation URL.
Connecting grants access but does not enable every transfer. Start with a read-only import and deliberately save the flows you want.
Confirm account mode
Check the account name and the Live mode or Test mode label in Connections. Reports and transactions must come from the same mode as the connection. Your own merchant events are separate from the MySync subscription used to pay for the app.
Map the clearing workflow
In Transfer rules, select the company currency, Stripe clearing account, fee expense account and bank payout account. Set tax and income mappings for the supported document types you intend to create.
Import an overlapping sample
Import a small period containing an invoice, a paid payment, a fee and a completed payout. Review each record before enabling accounting exports. Unpaid and incomplete payment evidence needs review.
Choose one revenue source
Decide whether a transaction is represented by its invoice, an explicit standalone receipt or another integration’s sale. Do not send the same revenue through two routes.
Transfer and reconcile
Export the supported sample. Compare invoice balances, gross receipts, fee expenses and the payout transfer in MYOB against Stripe balance activity. Repeat the run and confirm existing transfers are not posted again.
Check the key fields
Use this reference alongside Transfer rules. Controls vary by platform and entitlement; review the labels shown in your app rather than assuming another platform’s mappings apply.
| Field or decision | What to check |
|---|---|
| Company currency | The supported transaction currency must agree with the configured MYOB accounting currency. |
| Clearing account | Receives supported gross funds before fees and bank transfers are reconciled. |
| Fee account | Expense destination for supported processing charges; review the tax treatment with your bookkeeper. |
| Bank destination | The bank receiving a supported payout or withdrawal. It is not automatically a sales-income account. |
| Sales ownership | Decide whether another integration already created the invoice or sale before enabling standalone receipts. |
| Transfer status | A captured event, a proposed mapping and a completed MYOB entry are distinct states. |
Run, inspect and repeat a small transfer
- Read the source records with the app’s import or preview action. Check the import count and a known source reference.
- Open Transfer rules, enable only the flows required by the sample and save. Review required fields and any highlighted sections.
- Start the relevant manual sync or transfer using the app’s job controls. Imports, previews, saved settings and completed transfers are different actions.
- Compare the actual MYOB document, quantity or financial entry against the expected source result. Review source currency, tax, freight, fees and receiving accounts where applicable.
- Run the same unchanged sample again. Existing completed work should be recognised. Investigate any uncertain result before repeating a financial write.
- When satisfied, select the required schedule and enabled flows. Review the time zone shown in the app and inspect the first scheduled result.
Track exported, unchanged, skipped, rejected and review outcomes separately. A successful run can still contain excluded or unsupported source records.
Resolve a failed or incomplete result
Live and test data do not agree
Read the mode displayed in Connections and compare it with the Stripe Dashboard mode used to inspect the transaction. A live key, test key and public or external-test install link are not interchangeable.
MYOB approval fails
Restart Connect MYOB from the app and approve the intended file. If MYOB reports a redirect-URI mismatch, send support the error text: that is an app-registration configuration problem, not a reason to share your MYOB password.
An automatic run never starts
Confirm the flow is enabled, required fields are saved, a real schedule is selected and the current plan includes it. A toggle without a timing selection cannot define when a job should run.
A transfer timed out or may already exist
Read the record note and inspect the destination first. Keep the original reference and run time. Do not create a manual duplicate while an outcome is uncertain. Use the app’s supported retry or review action once the actual result is known.
Manage billing and connection access
Check Account & help for the current Stripe app plans, included financial flows and monthly AUD billing. Choose a plan only after reviewing which records your business needs to post.
Use Account & help or the app’s account screen to inspect current entitlements and billing controls. Disconnecting a provider is separate from cancelling a subscription. Use the available billing controls to manage renewal; ask support if you cannot access them.
Disconnect removes the credentials held for that link. Revoke the provider’s app grant or API key when you also want to remove access at the source. Review mappings and sample results again after replacing a company file or destination account.
Gather useful support evidence
Send support@mysync.io the app name, affected store or account, source record reference, run time and time zone, action attempted and exact error message. Include a provider request ID when shown. Keep passwords, client secrets, access tokens and payment-card data out of the message.
Related references: MYOB Sync troubleshooting, MYOB errors and logs and activity.
Choose another MYOB Sync guide
- Neto setup
- Shopify setup
- WooCommerce setup
- BigCommerce setup
- Squarespace setup
- Klaviyo setup
- Mailchimp setup
- PayPal setup
- eBay setup
- Amazon setup
- Square setup
Stripe integration features · Workflow planning guide · All help guides